There is a specific, soul-warming magic that happens when a humble, starchy fruit is transformed into a buttery masterpiece. Boiled Green Plantains are a cornerstone of Caribbean and Latin American cuisine, offering a versatile canvas that is as nutritious as it is delicious. Whether you grew up eating these at a family table or are discovering them for the first time, achieving that signature creamy texture is an art form in itself.
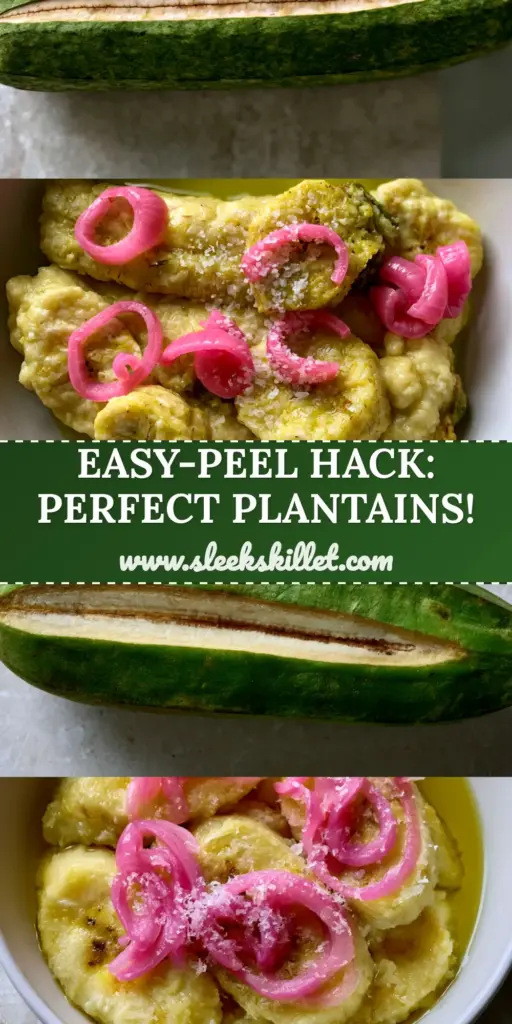
The visual contrast of this dish is striking: the rugged, deep emerald exterior of the raw fruit giving way to steaming, pale yellow rounds. In this guide, we are going deep into the traditional techniques that ensure your plantains are never dry or gummy. Instead, we are aiming for a soft, melt-in-the-mouth consistency elevated by a bright pop of acidity and a finishing touch of high-quality oil.
By the time you finish reading, you will master the “vertical score” technique and understand the exact sensory cues that signal a plantain is ready for the table. From the vibrant pink of pickled red onion rings to the glisten of golden extra virgin olive oil, every element here serves a purpose in creating a balanced, high-RPM meal experience.
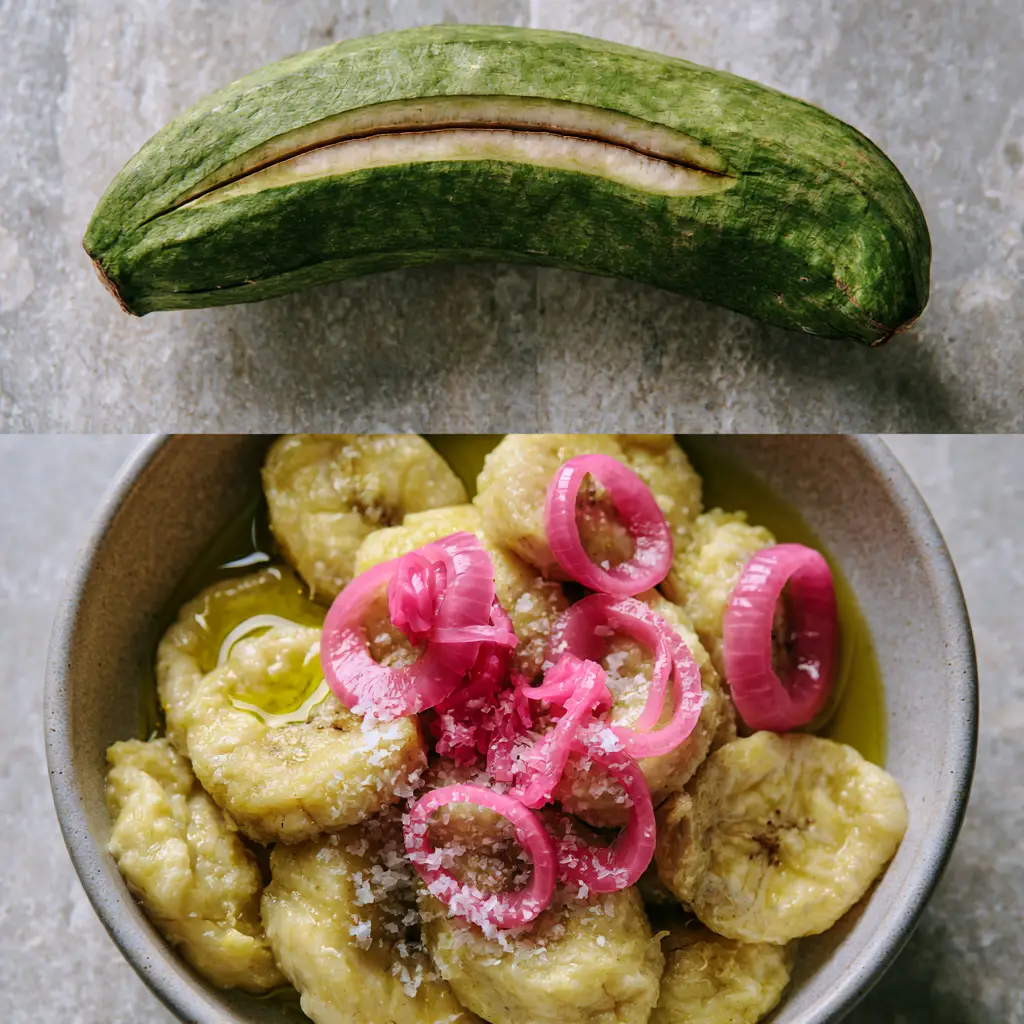
Why This Boiled Green Plantains Recipe Works
- Textural Contrast: We focus on achieving a creamy mashed plantain texture inside the rounds while maintaining their structural integrity.
- Flavor Balancing: The natural earthiness of the plantain is perfectly offset by the sharp, acidic bite of quick-pickled red onions.
- Technique Focused: You will learn the professional way to handle the thick skin of a raw green plantain with a precise vertical score.
- Clean Ingredients: This dish relies on whole foods, healthy fats, and mineral-rich flaky sea salt for a nutrient-dense profile.
Essential Elements for the Perfect Plantain Bowl
To achieve the results seen in our visual blueprint, you need a combination of starchy staples and high-contrast garnishes. Each ingredient plays a specific role in the chemistry of the dish.
Green Plantains: Look for plantains that are firm and entirely green with no yellow spots. These provide the high starch content necessary for a savory, potato-like finish rather than a sweet one.
Sea Salt: 2 tbsp (30g) of fine sea salt for the boiling water is non-negotiable. This seasons the plantain from the inside out as the starch granules swell and absorb the liquid.
Red Onion: 1/2 medium (approx. 110g) red onion, sliced into thin rings. These will be pickled to provide that vibrant pink visual and a necessary crunch.
White Vinegar or Lime Juice: 1/4 cup (60ml) of acid is required to macerate the onions. This softens their raw bite and creates the bright pink hue that makes the dish pop.
Extra Virgin Olive Oil: 2 tbsp (30ml) of your best finishing oil. The fat provides a luxurious mouthfeel that complements the lean, starchy plantain flesh.
Flaky Sea Salt: A generous pinch for finishing. These large crystals provide a “crunch” and a burst of salinity that enhances the creamy texture of the boiled rounds.
Professional Tools for Culinary Precision
Achieving the visual perfection of a split-focus food shot requires the right tools to handle the plantain’s unique anatomy. A dull knife is the enemy of a clean vertical score.
You will need a sharp Chef’s knife to penetrate the thick, fibrous skin without bruising the pale flesh beneath. A heavy-bottomed Dutch oven or stockpot is also essential to maintain a steady, rolling boil, ensuring the plantains cook evenly from edge to center.
Lastly, a small non-reactive bowl (glass or ceramic) is needed for the pickled onions. Avoid metal bowls for pickling, as the acid can react and create an “off” metallic flavor that ruins the freshness of the garnish.
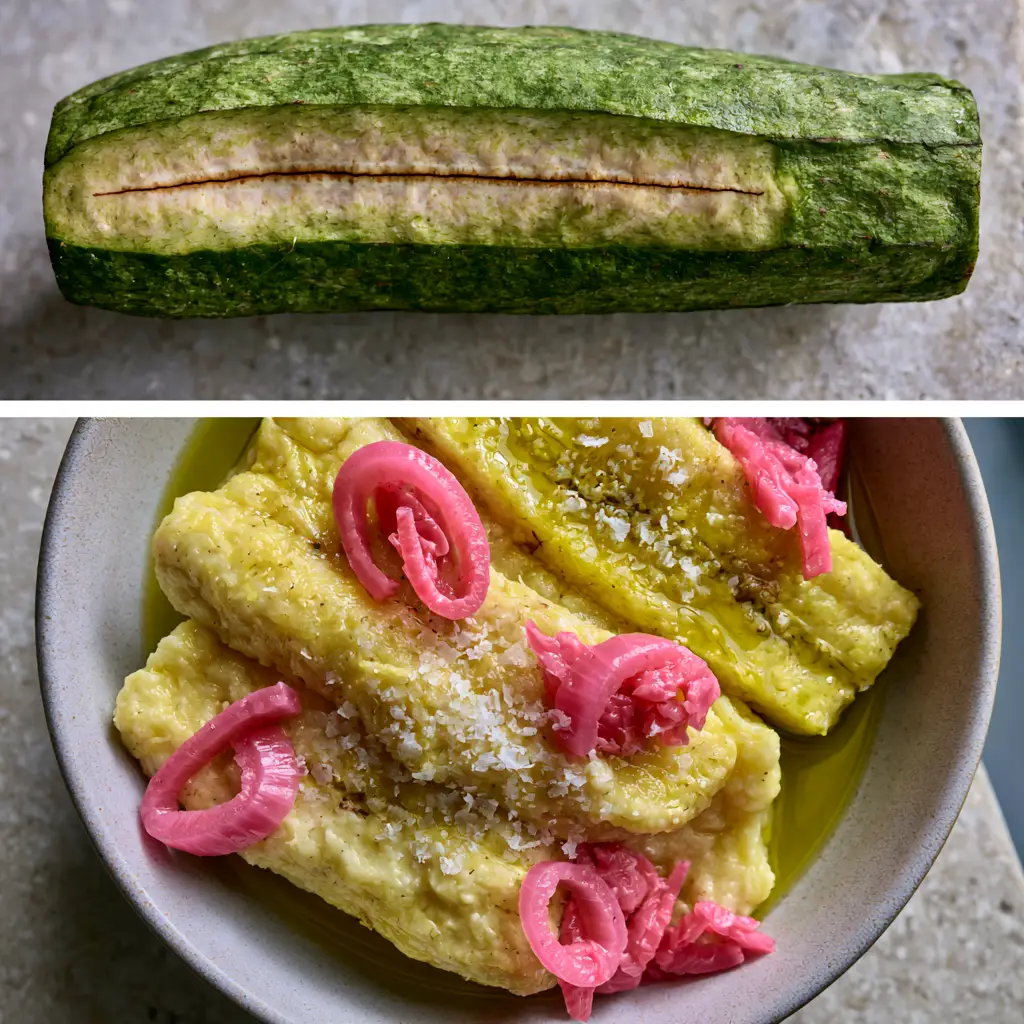
A Masterclass in Prepping and Boiling Green Plantains
The Art of the Vertical Score
Start by trimming the ends off each green plantain. Using the tip of your knife, make a single, deep, clean vertical score through the thick green skin from top to bottom. Be careful to cut through the skin but stop just as you feel the resistance of the pale flesh; this allows the skin to expand and eventually slide off easily.
Achieving the Perfect Simmer
Fill a large pot with water and add your sea salt. Bring it to a vigorous boil before adding the plantain pieces (you can cut them into halves or thirds to fit the pot). Boiling them in the skin helps protect the delicate starches and prevents the exterior from becoming waterlogged or mushy.
The Quick Pickle Garnish
While the plantains simmer, toss your thinly sliced red onion rings with vinegar and a pinch of salt. As the onions sit, they will transform from a sharp purple to a vibrant, glowing pink. This transformation is a key sensory cue—the onions are ready when they are limp and translucent.
Testing for Doneness
Boil the plantains for 15 to 20 minutes. Use a fork to pierce a round; it should slide in with zero resistance, similar to a boiled potato. At this point, the skin will have darkened significantly, often turning a brownish-green, which is a perfect visual indicator of internal tenderness.
The Final Reveal and Plating
Drain the plantains and carefully peel away the skin while they are still steaming. Slice the flesh into thick rounds, approximately 1-inch (2.5cm) thick. Arrange them in a bowl, top with the pickled onions, a heavy drizzle of olive oil, and a dusting of flaky salt. The steam should be visible, indicating the plantains are at their peak “creamy mashed” state.
Pro Tips for Flawless Texture
- Prevent Staining: Green plantains release a sticky sap. To prevent your hands or knife from staining, rub them with a light coating of vegetable oil before you begin the vertical score.
- The Ice Water Trick: If you find the plantains are sticking to the skin after boiling, plunge them into a bowl of cold water for 30 seconds. The thermal shock helps separate the skin from the fruit.
- Control the Starch: For an even creamier result, add a tablespoon of olive oil directly into the boiling water. This helps lubricate the starches as they cook.
- Acid is Key: Don’t skip the pickled onions. The acidity is chemically necessary to cut through the heavy starch of the plantain, refreshing the palate between bites.
Keeping Your Plantains Fresh
Boiled Green Plantains are best enjoyed immediately while the steam is still rising. However, if you have leftovers, they can be stored in an airtight container in the refrigerator for up to 3 days. Note that the starch will “set” and become firmer once cooled.
To reheat, do not use a microwave as it will make them rubbery. Instead, lightly sauté the rounds in a pan with a little butter or oil until heated through. This actually creates a delicious “boiled then fried” texture that is highly sought after in many Caribbean households.
Freezing is possible but not recommended for the boiled version, as the cell structure of the plantain tends to break down, resulting in a grainy texture upon thawing.
Main Dishes That Pair Perfectly with Starchy Sides
These plantains are a versatile side dish that can anchor a variety of global flavors. If you are looking to build a full meal, consider these pairings.
For a traditional Latin-inspired dinner, serve these alongside some saucy chicken tinga. The smokiness of the chipotle sauce is incredible when soaked up by the creamy plantain rounds. If you prefer a grilled option, the charred exterior of steak kabobs provides a wonderful textural contrast to the soft fruit.
For those looking for meat-free options, these plantains fit perfectly within a rotation of 30-minute vegetarian meals. You might also enjoy serving them alongside a vibrant mexican street corn salad for a feast of different textures and corn-based flavors.
Frequently Asked Questions
Yellow plantains are riper and sweeter. While you can boil them, they will be very soft and sugary. For this savory, creamy texture, you must use firm green plantains.
While you can peel them first, boiling them in the skin (with a vertical score) helps retain moisture and prevents the exterior from getting mushy.
Green plantains release a resinous sap. Coat your hands and knife in a little bit of cooking oil before handling them to create a protective barrier.
Yes! When red onions are soaked in an acid like vinegar or lime juice, a chemical reaction occurs with the anthocyanins, turning them a vibrant bright pink.
This usually happens if the plantains weren’t cooked long enough or if the water wasn’t at a full boil. Ensure they simmer for at least 15-20 minutes until a fork slides through with no resistance.
The Ultimate Boiled Green Plantains Recipe
Boiled Green Plantains: The Ultimate Guide to Perfectly Tender Caribbean Slices
Ingredients
Equipment
Method
- In a small non-reactive bowl, combine the red onion rings with vinegar and a pinch of salt. Set aside to macerate until they turn vibrant pink.
- Trim the ends of the plantains. Use a sharp knife to make a single vertical score through the skin of each plantain, being careful not to cut deep into the flesh.
- Place plantains in a pot of salted boiling water. Cook for 15-20 minutes until the flesh is tender and the skins have darkened.
- Drain the water. Carefully peel the skins off the hot plantains and slice the pale yellow flesh into 1-inch rounds.
- Arrange the steaming rounds in a bowl. Top with the pickled pink onions, a generous drizzle of olive oil, and flaky sea salt.
Notes
Ensure the water is heavily salted to properly season the starch.
Transform Your Kitchen with Simple Caribbean Flavors
Mastering Boiled Green Plantains is a gateway to understanding the beauty of tropical starches. The combination of the “buttery” yellow flesh and the “electric” pink onions creates a dish that is as visually stunning as it is satisfying. It proves that with just a few ingredients and the right technique, you can create a restaurant-quality side dish at home.
We would love to see how your plantains turned out! Did you achieve that perfect vertical score? Leave a comment below and share your success with our community. Don’t forget to follow us on Pinterest for more culinary inspiration and visual recipe guides. If you loved this recipe, please give it a 5-star rating in the card above!