Peanut Butter Eggs are the holy grail of seasonal confections, sparking a cult-like following every spring. There is something undeniably addictive about the ratio of that velvety-smooth, dense peanut butter center to the thin, snap-perfect milk chocolate shell. While the store-bought versions are iconic, making them at home allows you to elevate the quality of the chocolate and achieve that professional, glossy finish that makes every bite feel like a gourmet experience.
If you have ever bitten into a candy and wished the filling was just a bit creamier or the salt was a bit more pronounced, this recipe is for you. We have meticulously tested the moisture levels to ensure the rich golden-yellow hue of the interior looks exactly like a high-end chocolatier’s creation. Whether you are prepping for a holiday or just satisfying a deep craving for homemade chocolate treats, these eggs will become your new standard.
Why These Are the Best Homemade Peanut Butter Eggs You Will Ever Make
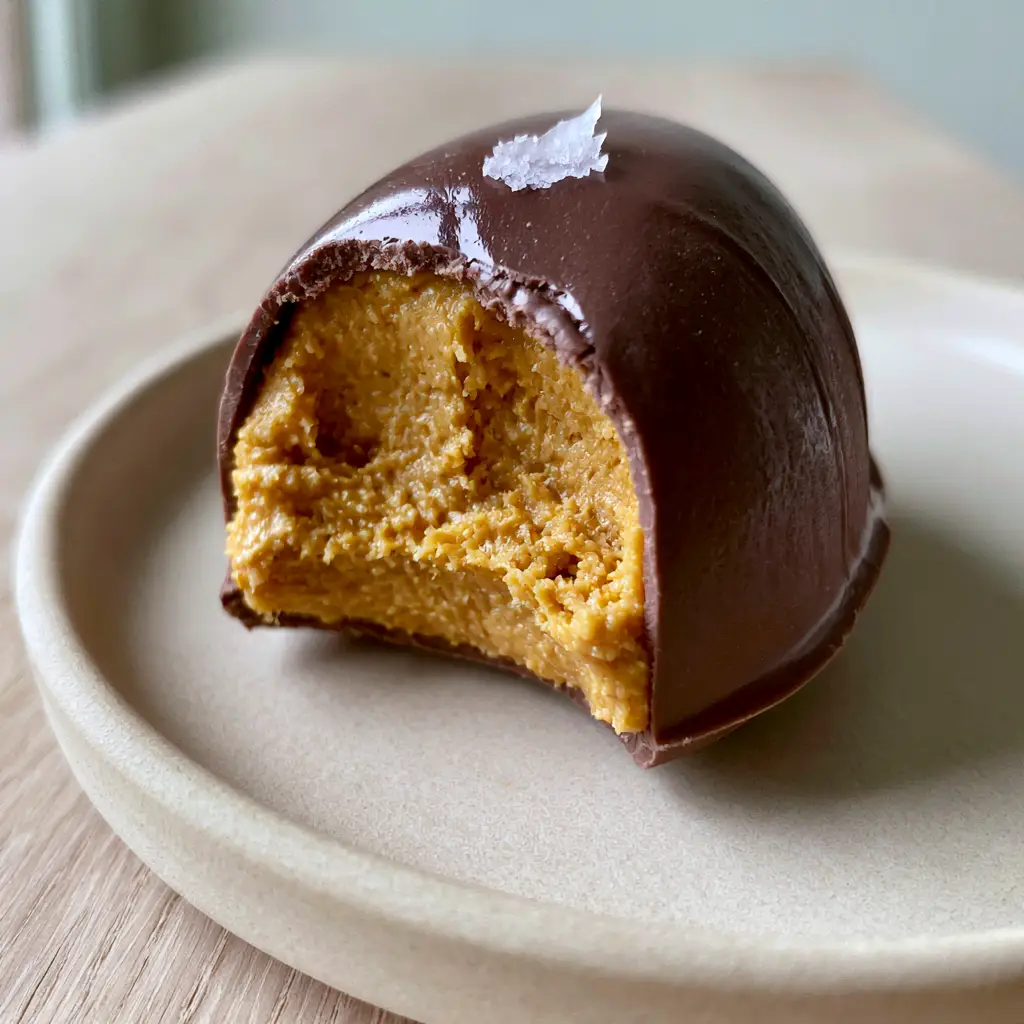
- Perfectly Balanced Textures: A dense, creamy filling paired with a thin, glossy milk chocolate coating that doesn’t crack when you take a bite.
- Professional Visual Appeal: A single delicate flake of sea salt provides a high-end aesthetic and cuts through the sweetness.
- Controlled Ingredients: No preservatives or artificial oils—just pure, high-quality fats and sugars for a cleaner taste.
- Pinterest-Worthy Results: These look exactly like the viral photos, with a velvety-smooth interior that holds its shape perfectly.
If you love this flavor profile, you should also check out our classic peanut butter blossoms or these decadent pumpkin chocolate chip cookies for more sweet inspiration.
The Secret Ingredients for a Velvety Smooth Filling
Creating the perfect Peanut Butter Eggs requires more than just mixing two ingredients. It is about the science of emulsion and fat stability. Each component in this list serves a specific culinary purpose to ensure your eggs don’t melt at room temperature.
Creamy Peanut Butter: Use a standard commercial brand (like Jif or Skippy) rather than natural “oil-on-top” varieties. The stabilizers in commercial peanut butter ensure the dense, creamy peanut butter center remains cohesive and doesn’t become oily.
Unsalted Butter: Softened 1/4 cup (57g) of butter adds a luxurious mouthfeel and helps the filling set firmly when chilled. It acts as the “glue” for our golden-yellow interior.
Powdered Sugar: 2 cups (240g) of confectioners’ sugar provides sweetness and structure. It absorbs the moisture from the peanut butter to create a dough-like consistency that is easy to mold.
Milk Chocolate Wafers: For that smooth glossy milk chocolate coating, high-quality melting wafers or a chopped chocolate bar with a high cocoa butter content are essential. Avoid chocolate chips if possible, as they contain stabilizers that prevent a truly fluid melt.
Coconut Oil or Shortening: Just 1 teaspoon (5ml) stirred into the melted chocolate ensures a perfectly glossy shell and a thinner, more professional coating.
Flaky Sea Salt: A single delicate flake of sea salt is the final touch. It balances the sugar and enhances the roasted notes of the peanut butter.
Step-by-Step: Mastering the Copycat Peanut Butter Egg
1. Creating the Golden Filling
Start by creaming together 1 cup (250g) of creamy peanut butter and 1/4 cup (57g) of softened butter. You want a completely homogenous mixture with no streaks. Slowly incorporate the 2 cups (240g) of powdered sugar and a pinch of fine salt.
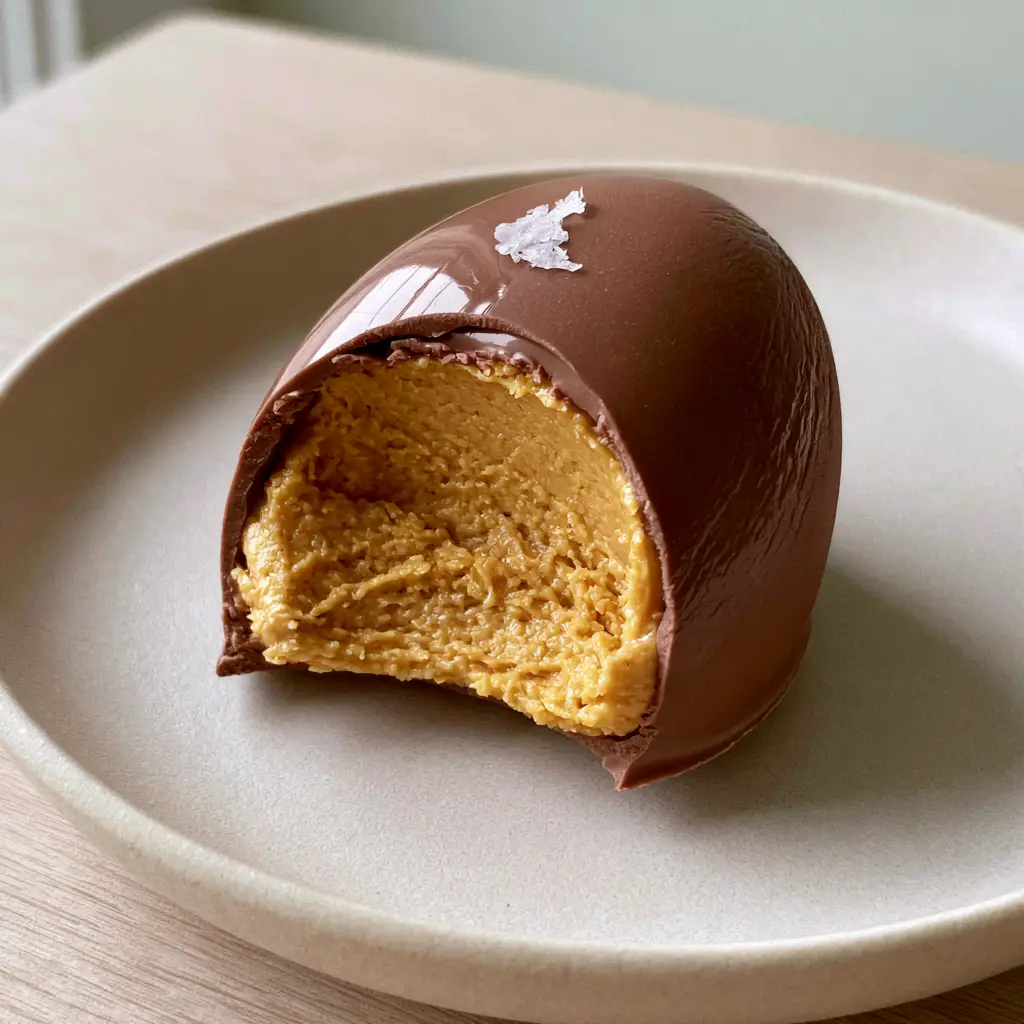
Visual Cue: The dough should be soft but not sticky. It should look like a rich golden-yellow matte paste. If it is too soft to handle, chill it for 15 minutes before shaping.
2. Shaping the Perfect Egg
Scoop about 2 tablespoons (30ml) of the mixture and roll it into an oval. Gently flatten it on a parchment-lined tray to roughly 1/2 inch (1.25cm) thickness. Use your fingers to taper one end slightly, mimicking the classic egg shape.
Pro Tip: Place the shaped centers in the freezer for at least 30 minutes. This is non-negotiable! If the centers aren’t frozen, they will melt into the warm chocolate, ruining the velvety-smooth interior.
3. Achieving the Glossy Chocolate Dip
Melt 12 oz (340g) of milk chocolate with your coconut oil in 30-second bursts in the microwave. Stir until it is thin and glossy. Using a fork, submerge a frozen peanut butter egg into the chocolate. Lift it out, tapping the fork against the side of the bowl to let the excess chocolate drip off.
Sensory Cue: You should see a perfectly glossy and even layer forming immediately. Slide the egg back onto the parchment paper using a toothpick to avoid fingerprints.
4. The Finishing Touch
While the chocolate is still wet, place one single delicate flake of sea salt right in the center. Let the eggs set at room temperature for 20 minutes, or in the fridge for 5 minutes if you are in a humid environment.
For more holiday-ready treats, you might enjoy our hot chocolate cookies or even a savory creamy deviled egg salad for your next brunch gathering.
Expert Tips for Success
- Temperature Control: If the chocolate starts to thicken, reheat it for 10 seconds. Cold chocolate creates a thick, clumpy shell rather than a thin, perfectly glossy layer.
- The Fork Method: Use a dedicated dipping tool or a long-tined fork. Never use your fingers, as the heat from your hands will smudge the milk chocolate shell.
- Avoid Condensation: When taking the eggs out of the freezer, work in small batches. If they sit out too long, they develop “sweat” (condensation), which can cause the chocolate to seize or slip off.
- Storage Matters: Store these in an airtight container with parchment paper between layers to prevent the glossy shells from scuffing.
Storage, Reheating & Freezing
Room Temperature: These Peanut Butter Eggs will stay fresh in a cool, dry place for up to 5 days. However, for the best “snap” in the chocolate, we recommend refrigeration.
Refrigeration: Keep them in the fridge for up to 2 weeks. The dense, creamy peanut butter center becomes even more fudgy when chilled.
Freezing: These freeze beautifully! Wrap them individually in plastic wrap and store them in a freezer bag for up to 3 months. Eat them straight from the freezer for a firm, candy-bar-like experience.
What to Serve With This
These eggs are a rich dessert, so they pair perfectly with a hot cup of coffee or a cold glass of milk. If you are hosting a themed party, consider serving them alongside other finger foods like our buffalo cauliflower bites for a sweet-and-spicy contrast, or a refreshing watermelon margarita for a spring celebration.
Frequently Asked Questions
We don’t recommend it. Natural peanut butter varies in oil content and lacks stabilizers, which can make the filling too soft or oily to hold its egg shape.
The key is to ensure the peanut butter centers are frozen solid before dipping. This prevents them from softening and falling apart when they hit the warm chocolate.
This is called ‘bloom.’ It happens when the chocolate is not tempered correctly or is stored in a place with fluctuating temperatures. It’s still safe to eat, just less visually appealing.
This usually happens if the chocolate is overheated or if it doesn’t have enough fat. Adding a teaspoon of coconut oil or shortening helps thin the chocolate for a professional, glossy finish.
Ready to Make the Ultimate Peanut Butter Eggs?
Peanut Butter Eggs: The Ultimate Copycat Recipe for Creamy Chocolate Bliss
Ingredients
Equipment
Method
- In a large bowl, cream together the creamy peanut butter and softened butter until completely smooth.
- Gradually add the powdered sugar and fine salt, mixing until a dense, golden-yellow dough forms.
- Scoop 2 tablespoon portions and mold into egg shapes. Place on a parchment-lined baking sheet.
- Freeze the peanut butter centers for 30 minutes until very firm.
- Melt the milk chocolate and coconut oil in the microwave in 30-second intervals until smooth and glossy.
- Using a fork, dip each frozen egg into the chocolate, tapping off the excess to ensure a thin layer. Return to parchment.
- Immediately top each egg with a single flake of sea salt while the chocolate is still wet.
Notes
Ensure centers are frozen before dipping to keep the chocolate shell smooth and even.
Save This Recipe for Later!
Did you love the velvety-smooth interior of these treats? Make sure to save this recipe to your Pinterest boards so you can find it every year! Follow toastpantry for more handheld smartphone-shot recipes that actually work.
If you made these, share a photo in the comments below—we love seeing your glossy chocolate shells! Don’t forget to leave a 5-star rating if these are better than the store-bought version.