The mango mousse cake is the ultimate intersection of tropical vibrancy and architectural dessert design. This isn’t just a treat; it is a structural masterpiece that balances a buttery, compressed foundation with a cloud-like, aerated center and a reflective, high-shine finish. If you have been searching for a show-stopping centerpiece that tastes like a summer sunset, this is the definitive guide.
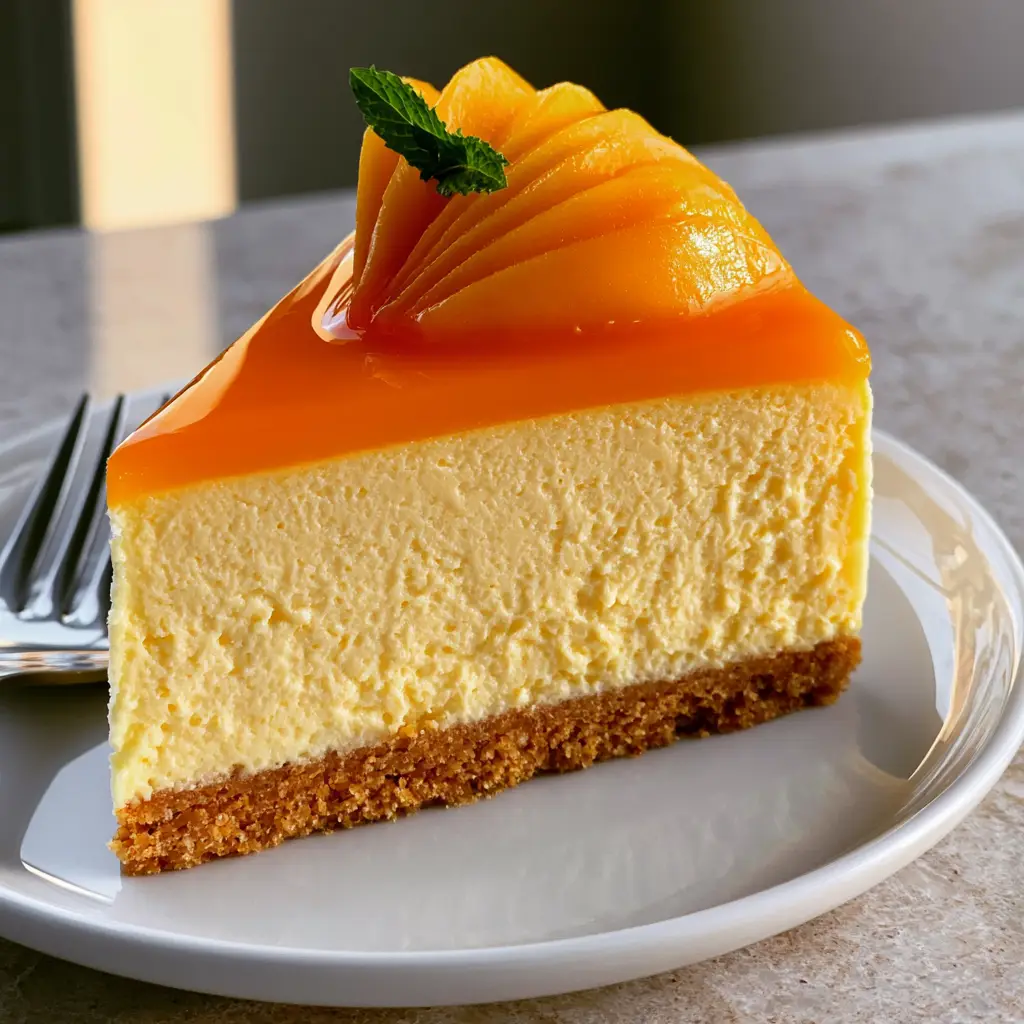
Capturing the essence of a sun-drenched afternoon, this mango mousse cake mirrors the golden hour light described in professional food photography. Every element, from the sharp, vertical edges of the slice to the tiny, bright green mint leaf garnish, is designed to provide a multi-sensory experience. It is a dessert that demands a silver fork and a moment of appreciation before the first velvety bite.
Whether you are a seasoned baker or a home cook looking to elevate your repertoire, this recipe provides the forensic detail needed for success. We will explore the culinary science of gelatin stabilization and the mechanical aeration required to achieve that signature dense yet airy mousse texture. Prepare to master the art of the mirror glaze and the perfectly leveled graham cracker crust.
Why This Architectural Mango Mousse Cake Works
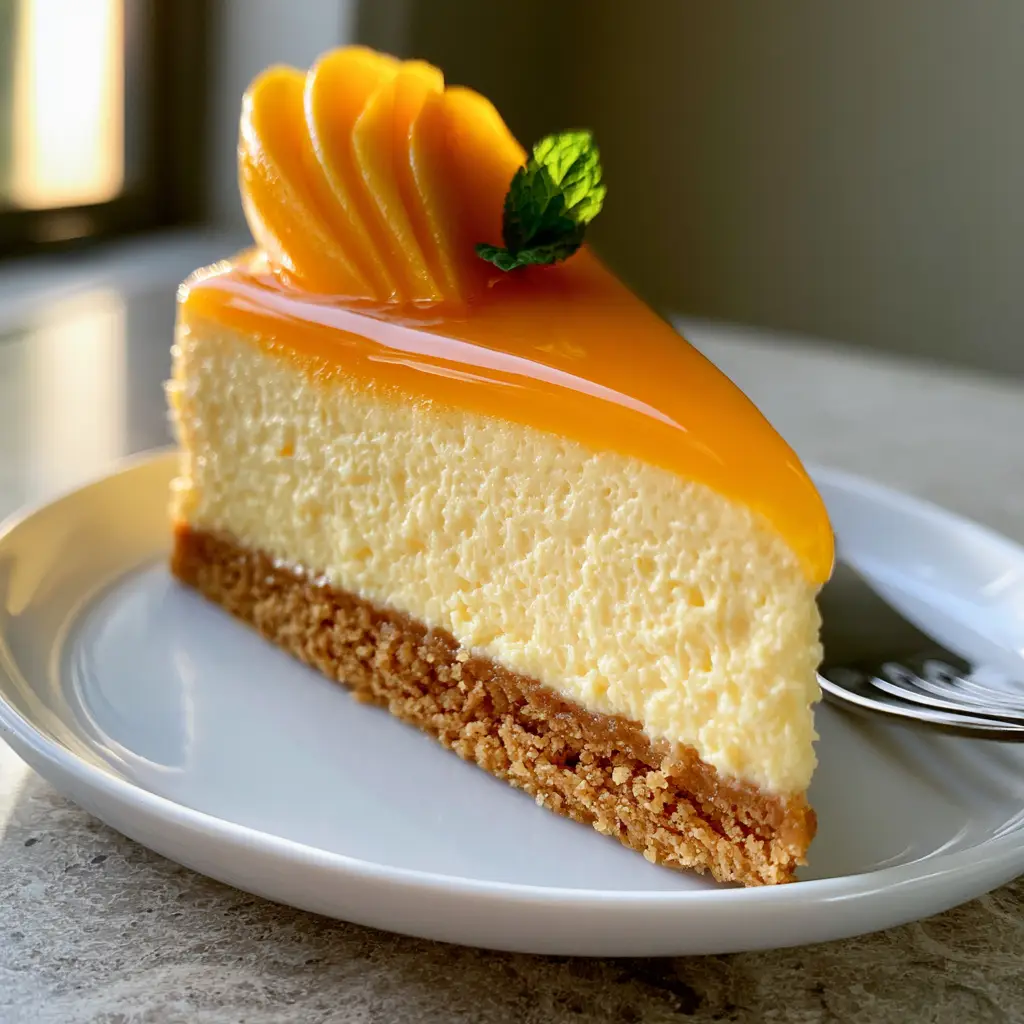
- Textural Contrast: A thick, golden-brown graham cracker crust provides a salty, buttery crunch that anchors the pale-yellow, velvety mousse.
- High-Gloss Finish: The deep orange mirror glaze is exceptionally glossy and reflective, creating a professional “patisserie” aesthetic at home.
- Pure Tropical Flavor: By using concentrated mango reduction, we ensure the mango mousse cake tastes intensely of fruit without being overly sweet.
- Visual Precision: Designed for macro photography, this cake yields clean, sharp edges that look stunning on a minimalist white ceramic plate.
The Anatomy of Ingredients: Foundations and Flavor
Honey Graham Crackers: 2 cups (200g) of finely crushed crumbs form the structural base of our cake. These provide a toasted, honey-forward flavor profile that complements the tropical fruit. You can explore other mango cakes to see how different bases affect the overall mouthfeel.
Unsalted Melted Butter: 1/2 cup (115g) acts as the “glue” for our crust. It must be thoroughly incorporated to ensure the crumbs are visible but compacted, preventing the base from crumbling when sliced. A pinch of sea salt added here enhances the sweetness of the mango.
Ripe Alphonso or Honey Mangoes: You will need 3 cups (720ml) of fresh puree. These varieties are chosen for their lack of fibrous strands and their vibrant, deep orange hue, which is essential for the mirror glaze. For a different texture, you might also enjoy a mango crepe cake using the same fruit profile.
Heavy Whipping Cream: 2 cups (480ml), chilled to exactly 40°F (4°C). This is the primary engine of aeration. When whipped to soft peaks and folded into the puree, it creates the pale-yellow, airy, and dense texture that defines a world-class mousse.
Powdered Gelatin: 4 tsp (14g) divided between the mousse and the glaze. Gelatin is the “invisible” ingredient that provides the vertical stability required for those sharp, clean edges. It must be bloomed in cold water before being melted to ensure a smooth, lump-free consistency.
Granulated Sugar and Lime Juice: 1/2 cup (100g) sugar and 1 tbsp (15ml) lime juice. The sugar stabilizes the fruit puree, while the lime juice provides the necessary acidity to cut through the richness of the heavy cream and butter.
Essential Equipment for Patisserie-Quality Results
To achieve the tall, sharp vertical slice seen in our visual guide, a 9-inch (23cm) springform pan is non-negotiable. The removable sides allow you to release the cake without damaging the delicate mousse. Additionally, acetate cake collars are highly recommended to line the inside of the pan; this ensures the sides of the mango mousse cake remain perfectly smooth and reflective.
A high-speed blender is required to process the mango into a completely smooth silk. Any remaining pulp will ruin the “glossy and reflective” nature of the mirror glaze. Finally, an offset spatula and a digital thermometer are critical tools for the glazing process, as the glaze must be applied at precisely 90°F (32°C) to coat the cake evenly without melting the mousse layer.
Engineering the Perfect Golden Graham Cracker Crust
Pulverizing and Compacting the Base
Begin by pulsing your graham crackers in a food processor until they resemble fine sand. Transition the crumbs to a bowl and stir in the melted butter until the mixture looks like wet Mediterranean sand. If you’ve made Mexican street corn salad, you’ll recognize the importance of consistent grain size for even distribution.
Press the mixture into the bottom of your springform pan. Use the flat bottom of a measuring cup to apply heavy pressure. This compaction is what allows the crust to support the weight of the dense mousse while maintaining those visible buttery crumbs at the edge of the slice.
The “Blind Freeze” Technique
Instead of baking, we will freeze the crust for 20 minutes. This “blind freeze” sets the butter quickly, creating a moisture barrier. This prevents the mango mousse from seeping into the crust, ensuring that the golden-brown layer remains crisp and distinct from the pale-yellow mousse above it.
The Science of Aerated Mango Mousse
Blooming and Incorporating the Stabilizer
Sprinkle 2.5 tsp (9g) of gelatin over 3 tbsp (45ml) of cold water. Let it sit for 5 minutes until it forms a thick paste. Melt this gently in the microwave for 15 seconds until it is a clear liquid. Stir this into 1.5 cups (360ml) of your mango puree, ensuring the mixture is at room temperature to prevent premature setting.
Achieving the Velvety, Airy Texture
In a separate chilled bowl, whip your heavy cream and sugar until soft peaks form. Do not over-whip to stiff peaks, or the mousse will become grainy rather than velvety. Fold the mango mixture into the cream using a silicone spatula. The goal is a uniform, pale-yellow color with no white streaks, indicating perfect integration of the aerated fat and the fruit solids.
Setting the Middle Layer
Pour the mousse over your chilled crust. Use your offset spatula to smooth the top perfectly flat. Tap the pan firmly on the counter three times to release any trapped air bubbles. This step is crucial for the “dense yet airy” visual requirement. Chill for at least 4 hours, or until the surface is firm to the touch.
Crafting the Deep Orange Mirror Glaze
Refining the Mango Reduction
Combine the remaining 1.5 cups (360ml) of mango puree with 1/4 cup (50g) of sugar in a small saucepan. Simmer over low heat for 5-7 minutes. This reduces the water content and intensifies the orange color to that “vibrant, deep orange” seen in the prompt. Stir in the remaining bloomed gelatin until fully dissolved.
The Pour and Leveling Process
Strain the glaze through a fine-mesh sieve to remove every last bubble and fiber. Allow the glaze to cool to 90°F (32°C). Pour it slowly over the back of a spoon onto the center of the chilled mousse. Tilt the pan gently to allow the glaze to flow to the edges, creating an exceptionally glossy and reflective surface. Refrigerate for another 2 hours.
Mastering the Garnish and Presentation
The “Hot Knife” Slicing Method
To achieve that sharp vertical slice, run a thin-bladed knife under hot water and wipe it dry before every single cut. This melts the gelatin layers just enough to glide through without dragging the mirror glaze into the mousse. The result is a clean, macro-photography-ready edge that highlights the distinct golden, pale-yellow, and deep orange layers.
Final Touches: Mango Fan and Mint
Slice a fresh mango into paper-thin slivers. Fan them out slightly and place them on the center of the cake. Add a single, tiny, bright green mint leaf next to the mango fan. This provides a color contrast that makes the orange of the mirror glaze pop. Place the slice on a minimalist white ceramic plate, and don’t forget the silver dessert fork for that touch of elegance.
Expert Tips for Mango Mousse Success
- Temperature Control: Never pour warm glaze over the mousse, or the layers will bleed together. Always use a digital thermometer.
- Sieve Everything: For a truly glossy mirror glaze, strain the puree twice. Even the smallest fiber can break the reflection on the surface.
- Cream Consistency: Use heavy cream with at least 36% fat content. Lower fat “all-purpose” creams will not hold the aeration needed for the mousse.
- Gelatin Precision: Weigh your gelatin if possible. Too much makes the cake rubbery; too little causes it to slump when sliced.
Storage and Make-Ahead Instructions
This mango mousse cake is an excellent make-ahead dessert. It can be stored in the refrigerator for up to 3 days. To maintain the “glossy and reflective” finish, keep it in a deep airtight container so the lid doesn’t touch the glaze. We do not recommend freezing the fully assembled cake, as the mirror glaze can lose its shine and become tacky upon thawing.
What to Serve With This Tropical Centerpiece
For a complete tropical themed brunch, pair this cake with Greek yogurt waffles topped with fresh fruit. If you are serving this at a dinner party, a savory starter like steak kabobs or Thai-style ground pork skewers provides a wonderful protein-rich contrast to the sweet, light dessert.
If you’re looking for more mango inspiration, our mango bingsu is a refreshing shaved ice alternative for hotter days. For a cozy night in, you might even consider a molten lava mug cake as a quick chocolatey follow-up to this fruity main event.
Frequently Asked Questions
Yes, frozen mango works well. Thaw it completely and drain any excess water before pureeing to ensure the flavor is concentrated and the mousse doesn’t become watery.
No, this is a no-bake recipe. The crust is set by freezing/chilling the butter, and the mousse and glaze are stabilized with gelatin, making it a perfect summer dessert.
The key is to strain the glaze through a fine-mesh sieve and pour it slowly over the back of a spoon. Avoid whisking the glaze once the gelatin is added, as this incorporates air.
Use a thin, sharp knife dipped in hot water and wiped dry between every cut. The heat from the blade allows it to slide through the mirror glaze and mousse without sticking or dragging.
The most common reason is improperly bloomed gelatin or using fresh pineapple or kiwi nearby, which contain enzymes that break down protein. Ensure your gelatin is fully dissolved in warm liquid and chilled for the full 4-6 hours.
The Ultimate Mango Mousse Cake Recipe
[Image-Pin]
Mango Mousse Cake with a Glossy Mirror Glaze
Ingredients
Equipment
Method
- Combine graham cracker crumbs, melted butter, and salt. Press firmly into the bottom of a 9-inch springform pan using a flat cup.
- Freeze the crust for 20 minutes to set the structure.
- Melt the bloomed gelatin and stir into the mango puree with lime juice. Ensure it is smooth and at room temperature.
- Whip heavy cream and sugar to soft peaks. Gently fold the mango mixture into the cream until a pale-yellow, velvety consistency is achieved.
- Pour over the crust, smooth the top, and refrigerate for at least 4 hours until firm.
- Simmer mango puree and sugar, then dissolve the bloomed gelatin into the hot mixture. Strain through a fine-mesh sieve.
- Cool glaze to 90°F (32°C). Pour over the chilled cake and tilt to cover the surface. Chill for 2 additional hours.
Notes
Always strain your mango puree twice for a flawless mirror glaze.
[Image-Pin-2]
Conclusion: A Slice of Tropical Perfection
Creating a mango mousse cake is an exercise in patience and precision, but the reward is a dessert that looks and tastes like it came from a high-end patisserie. The combination of the buttery graham cracker crust, the airy mousse, and that signature glossy glaze creates a harmony of textures that is hard to beat. We invite you to share your creations with us on social media.
If you enjoyed this technical deep-dive, please consider signing up for our newsletter for more recipe forensics and SEO-optimized culinary guides. Be sure to pin this recipe to your dessert boards on Pinterest so you can find it the next time you need a stunning tropical treat!
[Image-Pin-3]